How to extract, create, and navigate Zip Files in C#
Learn how to zip and unzip compressed files with C#. Beware: it’s not as obvious as it might seem!
When working with local files, you might need to open, create, or update Zip files.
In this article, we will learn how to work with Zip files in C#. We will learn how to perform basic operations such as opening, extracting, and creating a Zip file.
The main class we will use is named ZipFile, and comes from the System.IO.Compression namespace. It's been present in C# since .NET Framework 4.5, so we can say it's pretty stable 😉 Nevertheless, there are some tricky points that you need to know before using this class. Let's learn!
Using C# to list all items in a Zip file
Once you have a Zip file, you can access the internal items without extracting the whole Zip.
You can use the ZipFile.Open method.
using ZipArchive archive = ZipFile.Open(zipFilePath, ZipArchiveMode.Read);
System.Collections.ObjectModel.ReadOnlyCollection<ZipArchiveEntry> entries = archive.Entries;
Notice that I specified the ZipArchiveMode. This is an Enum whose values are Read, Create, and Update.
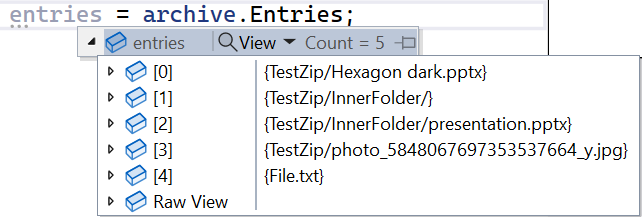
Using the Entries property of the ZipArchive, you can access the whole list of files stored within the Zip folder, each represented by a ZipArchiveEntry instance.

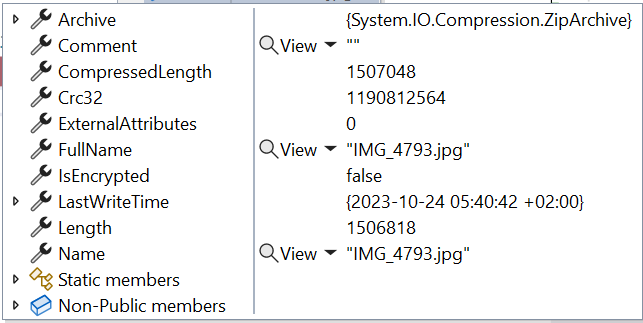
The ZipArchiveEntry object contains several fields, like the file's name and the full path from the root archive.

There are a few key points to remember about the entries listed in the ZipArchiveEntry.
- It is a
ReadOnlyCollection<ZipArchiveEntry>: it means that even if you find a way to add or update the items in memory, the changes are not applied to the actual files; - It lists all files and folders, not only those at the root level. As you can see from the image above, it lists both the files at the root level, like File.txt, and those in inner folders, such as TestZip/InnerFolder/presentation.pptx;
- Each file is characterized by two similar but different properties:
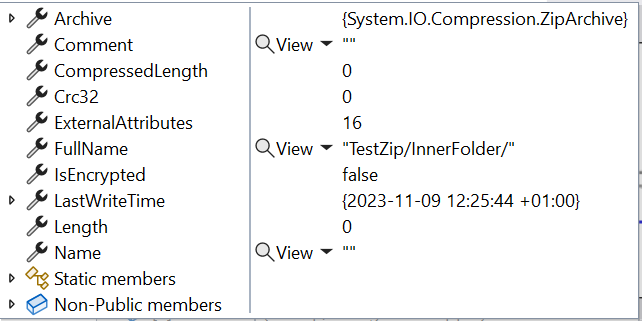
Nameis the actual file name (like presentation.pptx), whileFullNamecontains the path from the root of the archive (e.g. TestZip/InnerFolder/presentation.pptx); - It lists folders as if they were files: in the image above, you can see TestZip/InnerFolder. You can recognize them because their
Nameproperty is empty and theirLengthis 0;

Lastly, remember that ZipFile.Open returns an IDisposable, so you should place the operations within a using statement.
❓❓A question for you! Why do we see an item for the TestZip/InnerFolder folder, but there is no reference to the TestZip folder? Drop a comment below 📩
Using C# to extract the Zip to a local path
Extracting a Zip folder is easy but not obvious.
We have only one way to do that: by calling the ZipFile.ExtractToDirectory method.
It accepts as mandatory parameters the path of the Zip file to be extracted and the path to the destination:
var zipPath = @"C:\Users\d.bellone\Desktop\TestZip.zip";
var destinationPath = @"C:\Users\d.bellone\Desktop\MyDestination";
ZipFile.ExtractToDirectory(zipPath, destinationPath);
Once you run it, you will see the content of the Zip copied and extracted to the MyDestination folder.
Note that this method creates the destination folder if it does not exist.
This method accepts two more parameters:
entryNameEncoding, by which you can specify the encoding. The default value is UTF-8.overwriteFilesallows you to specify whether it must overwrite existing files. The default value isfalse. If set to false and the destination files already exist, this method throws aSystem.IO.IOExceptionsaying that the file already exists.
Using C# to create a Zip from a folder
The key method here is ZipFile.CreateFromDirectory, which allows you to create Zip files in a flexible way.
The first mandatory value is, of course, the source directory path.
The second mandatory parameter is the destination of the resulting Zip file.
It can be the local path to the file:
string sourceFolderPath = @"\Desktop\myFolder";
string destinationZipPath = @"\Desktop\destinationFile.zip";

ZipFile.CreateFromDirectory(sourceFolderPath, destinationZipPath);
Or it can be a Stream that you can use later for other operations:
using (MemoryStream memStream = new MemoryStream())
{
    string sourceFolderPath = @"\Desktop\myFolder";
    ZipFile.CreateFromDirectory(sourceFolderPath, memStream);

    var lenght = memStream.Length;// here the Stream is populated
}
You can finally add some optional parameters:
compressionLevel, whose values areOptimal,Fastest,NoCompression,SmallestSize.includeBaseDirectory: a flag that defines if you have to copy only the first-level files or also the root folder.
A quick comparison of the four Compression Levels
As we just saw, we have four compression levels: Optimal, Fastest, NoCompression, and SmallestSize.
What happens if I use the different values to zip all the photos and videos of my latest trip?
The source folder's size is 16.2 GB.
Let me zip it with the four compression levels:
 private long CreateAndTrack(string sourcePath, string destinationPath, CompressionLevel compression)
 {
     Stopwatch stopwatch = Stopwatch.StartNew();

     ZipFile.CreateFromDirectory(
         sourceDirectoryName: sourcePath,
         destinationArchiveFileName: destinationPath,
         compressionLevel: compression,
         includeBaseDirectory: true
         );
     stopwatch.Stop();

     return stopwatch.ElapsedMilliseconds;
 }

// in Main...

var smallestTime = CreateAndTrack(sourceFolderPath,
    Path.Combine(rootFolder, "Smallest.zip"),
    CompressionLevel.SmallestSize);

var noCompressionTime = CreateAndTrack(sourceFolderPath,
    Path.Combine(rootFolder, "NoCompression.zip"),
    CompressionLevel.NoCompression);

var fastestTime = CreateAndTrack(sourceFolderPath,
    Path.Combine(rootFolder, "Fastest.zip"),
    CompressionLevel.Fastest);

var optimalTime = CreateAndTrack(sourceFolderPath,
    Path.Combine(rootFolder, "Optimal.zip"),
    CompressionLevel.Optimal);
By executing this operation, we have this table:
| Compression Type | Execution time (ms) | Execution time (s) | Size (bytes) | Size on disk (bytes) |
| Optimal | 483481 | 483 | 17,340,065,594 | 17,340,067,840 |
| Fastest | 661674 | 661 | 16,935,519,764 | 17,004,888,064 |
| Smallest | 344756 | 344 | 17,339,881,242 | 17,339,883,520 |
| No Compression | 42521 | 42 | 17,497,652,162 | 17,497,653,248 |
We can see a bunch of weird things:
- Fastest compression generates a smaller file than Smallest compression.
- Fastest compression is way slower than Smallest compression.
- Optimal lies in the middle.
This is to say: don't trust the names; remember to benchmark the parts where you need performance, even with a test as simple as this.
Wrapping up
This was a quick article about one specific class in the .NET ecosystem.
As we saw, even though the class is simple and it's all about three methods, there are some things you should keep in mind before using this class in your code.
I hope you enjoyed this article! Let's keep in touch on Twitter or LinkedIn! 🤜🤛
Happy coding!
🐧

